
Introduction
A chrome delete is one of the most popular ways to upgrade your car’s appearance. It’s a simple yet impactful modification that removes the shiny chrome trim and replaces it with a sleek, modern black finish. Whether you’re looking to give your car a more aggressive look, protect your trim, or just add a personal touch, a chrome delete is a great DIY project.
In this guide, we’ll walk you through the DIY chrome delete process, from preparation to execution, so you can achieve a professional look right in your garage. Plus, we’ll show you how to avoid common mistakes and provide tips for long-lasting results. Let’s get started!
Key Takeaways
- Chrome delete is an easy DIY project for modernizing your car’s look.
- Essential tools include vinyl wrap, heat gun, and precision knives.
- The process involves cleaning, wrapping, and finishing touches for a smooth, sleek result.
- Proper maintenance ensures the wrap stays intact for years.
- Costs are low for DIY chrome delete, especially compared to professional services.
- Step-by-step guide to ensure you get a flawless chrome delete job every time.
What is Chrome Delete?
A chrome delete refers to the process of covering or removing chrome elements from your car’s exterior, typically using black vinyl wraps or paint. The most common areas affected by chrome include window trims, badges, grill accents, and door handles.
This modification is popular because it gives the vehicle a more aggressive and sophisticated look, without the expense of a full paint job. Chrome delete can also serve a functional purpose, as it helps protect your trim from oxidation and weathering.
Tools Needed for Chrome Delete
Before you begin the chrome delete process, it’s crucial to have the right tools on hand. Here’s a list of everything you’ll need to get the job done properly:
- Vinyl Wrap – Opt for automotive-grade vinyl, usually matte black or gloss black.
- Heat Gun – Essential for applying the vinyl smoothly and stretching it over curves.
- Precision Knife or Cutter – For trimming the vinyl with accuracy.
- Squeegee – Helps remove air bubbles and apply pressure evenly.
- Cleaning Supplies – Use isopropyl alcohol and microfiber cloths to clean surfaces before applying the vinyl.
- Masking Tape – To protect areas that should not be wrapped.
- Measuring Tape – To accurately measure and cut the vinyl wrap.
If you’re not sure which tools to buy, or if you’re looking for a more detailed guide on materials, check out our article on tools needed to wrap a car for in-depth recommendations.
Step-by-Step Guide to DIY Chrome Delete
Step 1: Prepare Your Car
Proper preparation is key to ensuring the vinyl adheres properly. Here’s how to get started:
- Clean the chrome: Wash the chrome trim thoroughly with water and soap.
- Wipe down: Use isopropyl alcohol and a microfiber cloth to clean the trim, removing any grease, wax, or residue.
- Dry thoroughly: Ensure the surface is dry before applying the vinyl.
A clean surface is essential for the vinyl wrap to stick, so don’t skip this step.
Step 2: Measure and Cut the Vinyl Wrap
Once the chrome trim is prepped, it’s time to measure and cut your vinyl wrap. Here’s the process:
- Measure the trim: Use your measuring tape to determine how much vinyl you’ll need to cover the chrome areas.
- Cut the vinyl: Unroll the vinyl wrap and cut it slightly larger than the area you’re covering. This will give you some extra material to work with and trim down later.
For a precise application, take your time when cutting the vinyl. If you need tips on how to cut vinyl accurately, we also have a detailed guide on how to wrap a car at home.
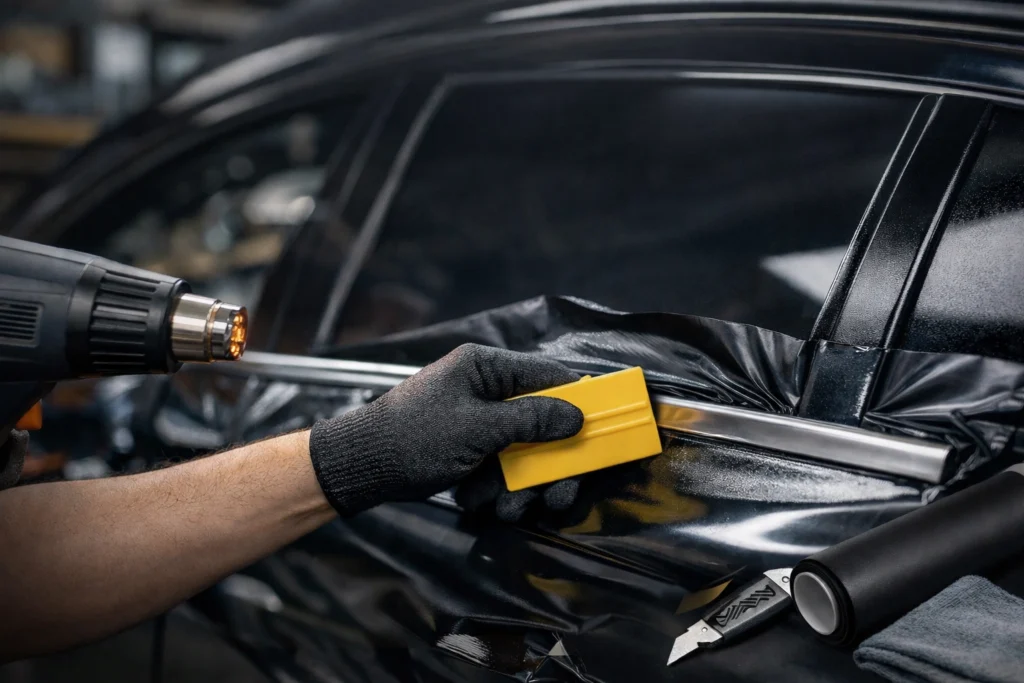
Step 3: Apply the Vinyl Wrap
Now comes the fun part—applying the vinyl wrap! Follow these steps carefully:
- Peel and place: Starting from one end, peel off the backing paper from the vinyl and carefully place it onto the chrome trim. Begin applying pressure gradually, ensuring the vinyl is in the correct position.
- Smooth the vinyl: Use the squeegee to press out any air bubbles and ensure that the vinyl lays flat against the surface.
- Heat the vinyl: Use the heat gun to gently warm the vinyl. This will make it more flexible and easier to stretch over curves.
- Stretch and adjust: Apply heat as needed and stretch the vinyl carefully to follow the contours of the trim.
- Trim the edges: Use your precision knife to trim away excess vinyl for a clean finish.
The heat gun is essential for getting the vinyl to mold properly around edges and curves, so take your time to work out any imperfections.
Step 4: Finish and Smooth the Edges
Once the vinyl is applied, the next step is to finish the edges. Here’s how to do it:
- Squeegee the edges: Run the squeegee along the edges to ensure the vinyl is fully adhered and there are no bubbles.
- Trim the excess: Use your precision knife to carefully cut off any remaining excess vinyl along the edges.
- Reheat problem areas: If you notice any wrinkles or bubbles, reheat the vinyl with the heat gun and smooth it out again.
Step 5: Let It Cure
After you’ve completed the wrap, it’s essential to give the vinyl time to set. Let it cure for at least 24 hours to ensure the adhesive bonds properly.
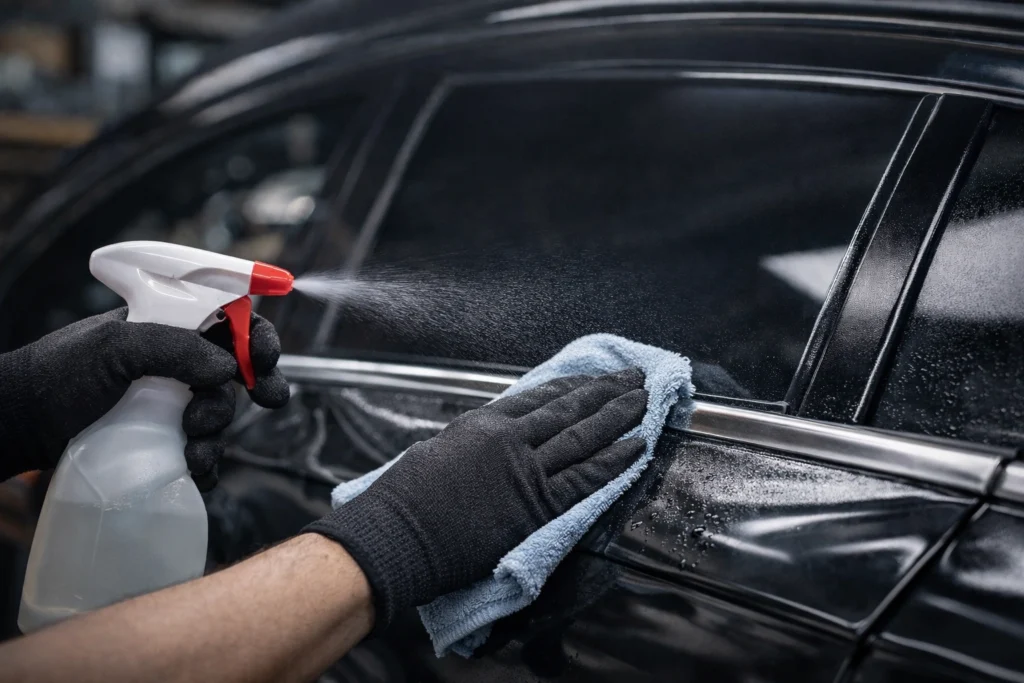
Maintenance and Care for Your Chrome Delete
To ensure your chrome delete lasts as long as possible, you’ll need to maintain it properly. Here are a few tips:
- Regular cleaning: Use a gentle car wash solution and a microfiber cloth. Avoid using harsh chemicals that can damage the vinyl.
- Don’t scrub aggressively: Avoid using rough towels or brushes on the wrapped areas.
- Inspect regularly: If you notice any edges lifting, reheat and press down with the squeegee.
By maintaining your chrome delete with care, it can last for several years.
Why DIY Chrome Delete?
There are several benefits to doing your own chrome delete:
- Cost-effective: A professional chrome delete can be expensive, but doing it yourself saves you a significant amount of money.
- Customization: You have complete control over the final look, choosing the exact finish and coverage.
- Satisfaction: Completing the project yourself gives you a sense of pride and accomplishment.
If you’re interested in learning more about the DIY car wrapping process, visit our post on tools needed to wrap a car for more guidance on the best equipment to use.
Vinyl Wrap FAQs
For the best results, opt for automotive-grade vinyl wraps like 3M 1080 or Avery Dennison. These brands are known for their durability and ease of application.
A chrome delete can last anywhere from 3 to 5 years, depending on the quality of the vinyl and how well you maintain it.
Yes, wrapping a car at home is absolutely possible with the right tools and patience. If you want to know more about wrapping a car, check out our article on can you wrap a car at home.
No, chrome delete is not permanent. It can be removed by peeling off the vinyl without damaging the underlying surface.
To remove vinyl wrap, use a heat gun to soften the adhesive, then peel off the vinyl gently.
A DIY chrome delete typically costs between $50 and $150, depending on the quality of materials and whether you already own the tools.
On average, a DIY chrome delete will take between 3 to 5 hours to complete.
Yes, a chrome grille can be wrapped with vinyl for a sleek blacked-out look.
Chrome delete can enhance the appearance of your car, but it doesn’t generally affect its resale value unless done poorly.
Chrome delete can be done on most vehicles, including sedans, SUVs, and trucks, as long as the trim can be wrapped or covered.
Final Thoughts
A chrome delete is a simple yet effective modification that can completely change the appearance of your car. It’s an easy DIY project that can be done with minimal tools and offers lasting results. By following this step-by-step guide, you can achieve a professional, sleek look without spending a fortune at a shop. For more tips and recommendations, visit Vinyl Wrap Pro for expert advice and top-quality products.