
Introduction
Have you ever wondered how professionals transform a dull car into a stunning matte or glossy finish using vinyl wraps? The process may seem daunting, but with the right tools and some patience, even DIY enthusiasts can achieve impressive results. In this guide, we’ll walk you through each step of the car wrap installation, from preparation to finishing touches. Whether you’re a beginner or an experienced installer, these expert tips will help you avoid mistakes and create a flawless wrap.
Key Takeaways
- Learn the step-by-step car wrap installation process with clear instructions for beginners.
- Discover the essential tools and tips for wrapping a car and avoid common mistakes.
- Save money by wrapping your car yourself, but also understand when it’s best to hire a professional.
- Compare different vinyl finishes (gloss vs. matte) for durability and aesthetic appeal.
- Get expert tips for a long-lasting vinyl wrap.
Step 1: Preparing the Vehicle
Preparation is key to a smooth application. A clean, smooth surface ensures proper adhesion and prevents bubbling or peeling.
Preparation Checklist:
- Wash and dry the car thoroughly, avoiding waxes and polishes.
- Use a clay bar treatment to remove surface contaminants.
- Remove parts like mirrors, badges, and trim to make wrapping easier.
Installer Tip:
“90% of a perfect wrap comes down to preparation. If the surface isn’t clean, even premium vinyl won’t stick.” — Mike Reynolds, Certified 3M Installer
Learn more about the tools needed for a successful car wrap.
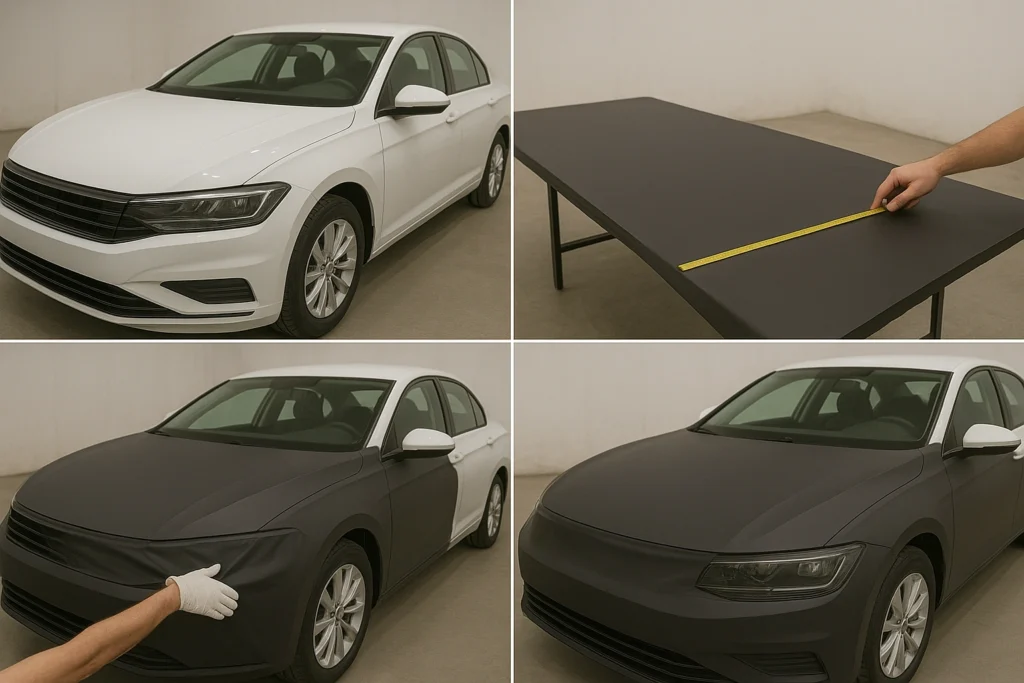
Step 2: Measuring and Cutting the Vinyl
Proper measurement reduces waste and ensures seamless coverage. Use a measuring tape and add 4–6 inches extra on all sides for adjustments.
Pro Tips:
- Work in sections (such as hood, roof, and doors) instead of attempting to wrap the whole car at once.
- Store vinyl in a clean, dust-free area to prevent contamination.
Step 3: Applying the Vinyl Wrap
This is the main step where the transformation happens!
Installation Process:
- Peel and position the vinyl on the panel.
- Use a squeegee to push out any air from the center outward.
- Apply heat with a heat gun to stretch vinyl around curves and edges.
- Trim excess vinyl using a precision knife.
DIY Warning:
Avoid overstretching the vinyl, as this can weaken its durability and cause color distortion.
For cost comparisons, check the cost of wrapping a car.
Step 4: Finishing Touches
Finishing details can make or break the appearance of your wrap.
Final Steps:
- Reinstall removed parts (mirrors, trims, lights).
- Use heat to permanently set vinyl edges.
- Inspect for air bubbles and fix them with a pin or squeegee.
Comparison Table: Gloss vs Matte Wrap Finishes
| Feature | Gloss Vinyl Wrap | Matte Vinyl Wrap |
| Look | Shiny, paint-like | Flat, modern |
| Maintenance | Needs frequent cleaning | Hides dirt better |
| Durability | 5-7 years | 4-6 years |
| Popular Brands | 3M Gloss, Avery Gloss | Hexis Matte, 3M Matte |
Vinyl Wrap FAQs (People Also Ask)
The cost of a full vehicle wrap ranges from $2,000 to $5,000, depending on the car size, vinyl brand, and finish. DIY enthusiasts can save $500–$1,500 by purchasing vinyl rolls, but improper installation can reduce the lifespan of the wrap.
Professionally installed wraps last 5-7 years, while DIY wraps last 3-5 years, depending on maintenance and climate. Gloss finishes tend to show scratches more easily, while matte wraps hide dirt better.
While DIY wrapping is possible, hiring a professional ensures a flawless finish and avoids common mistakes. Beginners often struggle with curves, edges, and large panels.
Gloss wraps provide a shiny, paint-like finish and are easier to clean, but they show scratches more easily. Matte wraps offer a modern, subtle look and hide dirt better, but require more careful handling.
Yes, vinyl wraps act as a protective layer against minor scratches, UV damage, and road debris. However, they are not a substitute for paint protection films.
A standard sedan requires 50–65 feet of vinyl (about 5-6 rolls). Larger vehicles like SUVs or trucks require more material.
Conclusion
The car wrap installation process requires patience, the right tools, and attention to detail, but the results can completely transform your vehicle’s look. By following this step-by-step guide, you’ll avoid common mistakes and achieve a finish that rivals professional shops. Whether you’re going for a glossy showroom shine or a matte stealth look, preparation and precision are key. Explore our guide on tools needed to wrap a car and take the first step toward your DIY wrap today!
Check out these:
Diy vs professional car wrap installation
How to Remove Vinyl Wrap Safely (Cars & Trucks)
How long does it take to wrap a car?
Can you wrap over bad paint or scratches?
What temperatures are best for installation?
How to fix peeling edges on a wrap
Gloss vs Matte vs Satin vs Chrome: Which Finish Should You Choose?